Thursday, March 31, 2016

Fans Installed, All Components Properly Installed

Kinda hard to tell, but the PEEK fan and the layer fan are installed and operational. I left the wire connections in "temporary" status because I'm planning to splice in at least one more fan and a couple LEDs.

This picture is taken facing downwards from just above the extruder hot end.


Here's the assembly with all errors-to-date corrected:


The spool and the extruder cold end are oriented correctly, the effector platform is flipped right-side-up and the hot end reinstalled correctly. The fans are installed for the first time.

Time to calibrate!

Sunday, March 27, 2016

Movement and First Prints

Homing the axes:


Printing a calibration cube:


Turns out it was only half a cube:


Progression of my first three attempts at the calibration cube:


Printing the PEEK heat break duct:


Intermediate shot of my first non-functional print. You can see the tiangular infill pattern (30% infill in this case):


Final result - a black, plastic-y diamond


A coworker stomped on it (after asking) and there was no visible damage. Original file here.

Saturday, March 12, 2016

Electronics

The printer is controlled by a RAMBo Controller board (revision 1.3 in my case). This controller takes input in the form of G-code, either from an on-board SD card, or over a USB cable from a computer. The G-code carries instructions (tool paths, for the most part) in Cartesian coordinates, and the RAMBo converts those instructions into commands for the stepper motors, accounting for the Delta's polar geometry in the process. This usually results in prints having artifacts like vertical banding. There are a couple of 32-bit controllers that recently came on the market, and they're getting really good reviews for eliminating vertical banding. It still sounds like a pain to set them up, so I'll re-investigate that potential upgrade in a year or so.


Extruder Cold End

Lots of errors here:

The extruder motor on the Rostock Max hangs below the top plate, in order to keep the distance between the "cold end" (the extruder motor) and the "hot end" (the heated nozzle) to a minimum.


The bracket is installed correctly, but I put the motor in backward. :-/

Here's what it's supposed to look like:


The white "gear" is a jog wheel so I can adjust the filament position manually. The red lever disengages the tension on the stepper motor so I can hang the filament out quickly if I want to.

After the extruder was in place (but not oriented correctly - that came later) I went on to install the spool holder and top plate - also at the wrong orientation:


The cold end and the spool holder are supposed to line up, like this:


But I didn't get it fixed until after my first couple prints were completed.

In my defense, the printer kit is set up so it's easy to set up a second extruder and spool (and at least one guy has gotten three extruders and spool operating at the same time).

Saturday, March 5, 2016

Installing the Thermal Elements

Heated Build Plate (also called the "bed"):


The heated bed is a large, 12-inch-diameter PCB, with one giant electrical trace arranged in a spiral. I haven't measured it myself, but it's supposed to have approximately 1 ohm of resistance. The wires that were in the kit for the power supply are only 18-gauge, carrying around 10 amps of current. I should have tossed the 18-gauge wires in my supply drawer and just used 14-gauge wire from the start, but that's going to have to be a future upgrade. EDIT: I upgraded to 14-gauge wires. I don't think the terminals on the control board could have taken anything larger, but 14 fit fine. Unfortunately, no noticeable performance improvement on bed heat-up times.

There is also a thermistor and an LED - the bed temperature is controlled by a Pulse-Width modulated power supply, and the LED flickers right along with the pulses to let you know if the heated bed is on or not.

Extruder Hot End:

Once the RTV silicone set up, I crimped the electrical connections and insulated all the conductive parts with Kapton Tape:


I ran the wires for the effector platform according to the directions:


And then make the connections to the hot end:


...which turned out to be a mistake. The hot end is supposed to sit on top of the effector platform, with just the nozzle poking through to the bottom of the effector platform. Instead, I had this:


I had to disassemble the hot end and feed the parts up through the effector platform to get the proper result:


(Actually, at this point I still had the effector platform upside down. But I would not discover that until later, when I tried to install the cooling fans.)

Here's what it looks like with the thermal elements installed:


Saturday, February 13, 2016

Hot End Assembly

The hot end included in my kit did not have a port drilled in it for the thermistor.


I contacted SeeMeCNC support. They offered to ship me a new one, but also sent me dimensioned drawings so I could drill it out myself. I didn't think it was worth making them deal with shipping a new one when fixing the problem was so easy. I just drilled it out by hand.


Once that was done, I inserted the thermistor and heating resistors, and cemented them in place with high temperature RTV silicone:


One of the forum members recommended threading the thermistor port and using a brass bolt to hold the thermistor in place. This would make it easier to swap the thermistor out if it failed. It seems that thermistor failures are pretty rare, however, and I'm expecting to replace this hot end with an all-metal version within a couple years, which would probably require a thermocouple to handle the higher temperatures, anyway.

Sunday, January 31, 2016

Assembling the Main Structure

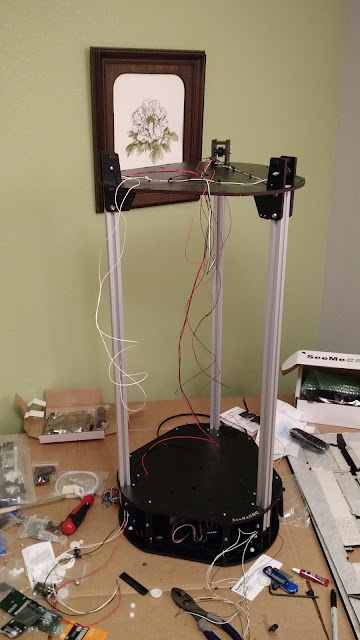
Got all the parts laid out and accounted for. The laser-cut melamine (the wood) is covered in masking tape that had to be removed - I cleaned up parts as I needed them, rather than peeling all the tape up front.


The build started with the Base, including wiring up the power supply and installing the stepper motors:


A lot of people install dampeners on the stepper motors at this next stage. They get really good reviews for quieting the motor, but can also introduce a little bit of slop, causing artifacts in the prints. Since my printer is going to be living in the basement, I opted for accuracy over silence.


Worth noting: there's now a product called a SilentStepStick. It can do up to 256 micro-steps, and is supposed to be a drop-in replacement for most standard stepper drivers, which can only do 8 or 16 micro-steps (pretty sure mine does 16 micro-steps, but I haven't verified yet). Apparently, that increased stepping resolution removes a lot of vertical banding from parts made on Delta printers, and pushes all the stepper noise into higher frequencies that are not audible to humans. So all the noise is still there, it's just not audible (unless you're a dog, maybe. Hmm. I have a dog...).

The next day, I threaded wires through the aluminum extrusion towers and got the towers in place:


Next I installed the belt (A GT2 timing belt, which is supposed to have little-to-no backlash):


...and the "skates" that control linear motion on the towers (also installed the "max" limit switches at the top of the tower - because of the Delta geometry, there are no "min" limit switches, which is definitely a weakness of this approach):


Once the skates were in place, I jumped ahead and installed the effector arms and the top plate so I could get a "beauty shot":


Doing things out of order would come back to bite me several times before I finished the build: the effector platform was upside down, and the top plate was rotated by 120 degrees - neither of which I noticed until after I installed other parts that had to be removed to correct the errors.

I had to call it a weekend at that point - my hot end was missing a port for the thermistor, which I'll go into on the next post: