Showing posts with label Heated Chamber. Show all posts

Sunday, August 7, 2016

Printer is Running Again!

Unfortunately, I needed the kick-in-the-butt of my Dad coming out for a visit to prompt me to tear down and fix my printer.

I pulled off the heated-enclosure brackets and lifted the bed in order to access the stepper motors, then put locktite on all the motor pulleys.


I also worked on the heat source for the heated chamber. Having two 150 watt bulbs right next to each other and inside a metal box concentrated the heat onto the top plate worse than I had realized. Here's the damage, viewed from below with the bulbs and fixtures removed:


To prevent this from happening again, I covered the bottom of the top plate with aluminum tape:
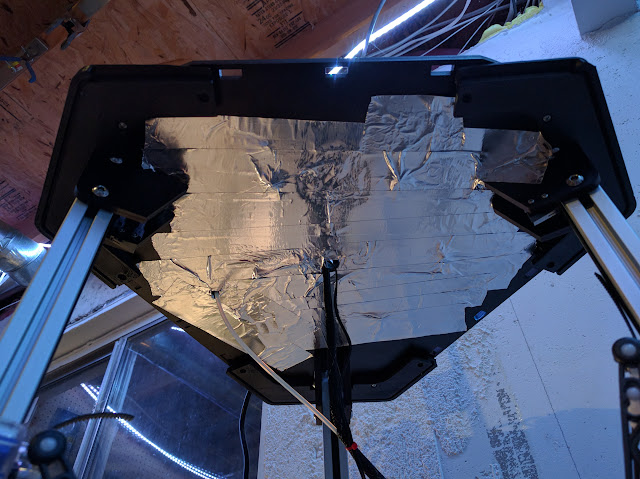

Later on, I'll clean it up and add some ceramic insulation around the bulb fixtures (I have to find it again - it got lost in my sea of stuff).

After a quick re-assembly (and some really quick calibration), I ran the file for "knurled bolt and nut", this time with white filament. All things considered, it turned out pretty well, though not as nice as the previous two I made.


All in all, it was some good male bonding, and Dad took the bolt and nut home as a souvenir!


Sunday, May 15, 2016

Problems with the Heat Source for the Heated Chamber

Printing with one halogen bulb had worked fairly well, so I advanced to the next stage - adding a second bulb for a total of 300 watts of heat. To do so, I redid the wiring - everything has a properly colored 14-gauge wire now (which is not to say that it's pretty yet).


Unfortunately, the extruder no longer worked properly inside the heated chamber with the extra heat. Interestingly, it didn't seem to be an electrical problem - the filament softened and jammed inside the cold end of the extruder:


You can see the jam on the right side of the filament in the above photo. Since the extruder couldn't push the filament through the bowden tube once the jam formed, it chewed through the filament and then spun freely until the end of the print file.

So, I proceeded to move the extruder to the outside of the heated chamber. I had previously printed two different options for the external extruder mount, and today I chose the one that was the easiest drop in replacement:


I also had to make a longer bowden tube to guide the filament between the cold end and the hot end. Generally, you want as short of a bowden tube as possible to minimize slop, so it's a bit of a bummer that I couldn't keep the cold end inside the chamber.

After I had that system running for a bit, I noticed that the aluminized styrofoam was not handling the increased heat well:


I made myself a quick metal shield from some scrap metal:


Unfortunately, once that was in place, the melamine (the wood) started to blister and smoke!


So at the end of the day, I'm back down to just one bulb. Later on I might put more bulbs in, as one bulb seems to max out at 50C for the chamber temperature. If I do, however, I'll space them out quite a bit more, or put some kind of stand-off between the wood and the bulbs.


One bulb can get the chamber up to 50C. I saw the melamine start to smoke before the chamber had gotten past 60C - not sure what the upper limit is there. Based on forum posts, it seems like the ideal chamber temp is around 70C.

Thursday, April 21, 2016

Heated Build Chamber

Heated build chambers are very useful when printing with ABS (apparently less so with PLA or PET, but I don't have any experience printing with those materials yet). Having a heated chamber is particularly important when the printer is in a cold basement, like mine is.

The Rostock community has come up with two common designs for heated chambers. I went with jfettig's design, mostly because it looked fairly cool.


It's designed to take 1/8" Lexan (polycarbonate) sheets. Unfortunately, the dimensions are kinda screwy. The vertical dimensions are all 28.5" tall. The horizontal dimensions are 5.25" and 12.75" wide. Lexan is sold in sheets whose dimensions are multiples of 12". So jfettig's design results in a lot of waste polycarbonate. Which is relatively expensive. I looked around a bit, and it would cost around $200 just for the Lexan sheets, never-mind the angle pieces and shipping.

While I was looking for a cheap source of Lexan, I printed the brackets for the heated chamber from Jfettig's design files.

First the top corner brackets, experimenting with orientation and "helper discs" to try to control warping/curling:

X-tower top bracket
Y-tower top bracket
Z-tower top bracket
With those three brackets printed, I gave up on being able to print non-warped parts without a heated chamber, and still didn't want to pay out for Lexan.

I picked up some rigid styrofoam insulation with aluminum lining for about $5 and set up a rudimentary chamber:


I didn't have a heat source yet, but I did have a temperature controller with a temperature display (the red LED readout sitting on top of the printer). I proceeded to print the bottom brackets, still experimenting with helper discs, rafts, and orientation:


Incidentally, printing large, flat objects like these on rafts is terrible. They printed without warping, but I had to use a wood chisel to separate the part from the raft, and often left some of the part on the raft (or vise versa) anyway. I also managed to give myself a nice little scar on my left pinkie finger by being careless during this process (It was the first time my 16-month-old son saw me bleed - kinda freaked him out a bit).

During this same period, I printed off an external extruder mount (we'll get back to that later) which I printed with no raft or helper discs, and turned out with no warping - likely because it was much smaller:


I assembled the brackets to the printer's frame, and cut the foam insulation to size. I installed a mount for a halogen bulb, controlled by an old dimmer switch I had lying around and the temperature controller.


And there it is! A working, cheap, heated enclosure. The interior gets up to 50C with one 150-watt halogen bulb.

Later on, I used metal tape to cover over the gaps between the insulation panels. The metal tape is folded on itself and attached only to the smaller corner panels. This way, the panels can be completely removed (and replaced) from the printer easily.


I cut a hole in the front panel and covered the hole with a small, $12 piece of Lexan:


Unfortunately, I would have an unrelated failure before I completed my first print with the heated chamber. But that's a story for the next post.

In the future, I'm going to have at least one (probably two) webcams on this printer so I can check progress without going down to the basement. I already caused one cheap USB webcam to fail after it spent an hour inside the chamber (it turned back on the next day, after it had cooled down). I also want to figure out a way to fit the panels on more securely, without relying on blue painters tape. The bracket design was intended for 1/8" plastic panels, not 1" foam insulation. That may require me to design and print my own brackets. (Update: for the time being, I just used a chisel to knock off the outer lip of the bracket. Not very pretty, but functional enough with the addition of binder clips).