
Got all the parts laid out and accounted for. The laser-cut melamine (the wood) is covered in masking tape that had to be removed - I cleaned up parts as I needed them, rather than peeling all the tape up front.

The build started with the Base, including wiring up the power supply and installing the stepper motors:


A lot of people install dampeners on the stepper motors at this next stage. They get really good reviews for quieting the motor, but can also introduce a little bit of slop, causing artifacts in the prints. Since my printer is going to be living in the basement, I opted for accuracy over silence.

Worth noting: there's now a product called a SilentStepStick. It can do up to 256 micro-steps, and is supposed to be a drop-in replacement for most standard stepper drivers, which can only do 8 or 16 micro-steps (pretty sure mine does 16 micro-steps, but I haven't verified yet). Apparently, that increased stepping resolution removes a lot of vertical banding from parts made on Delta printers, and pushes all the stepper noise into higher frequencies that are not audible to humans. So all the noise is still there, it's just not audible (unless you're a dog, maybe. Hmm. I have a dog...).
The next day, I threaded wires through the aluminum extrusion towers and got the towers in place:


...and the "skates" that control linear motion on the towers (also installed the "max" limit switches at the top of the tower - because of the Delta geometry, there are no "min" limit switches, which is definitely a weakness of this approach):

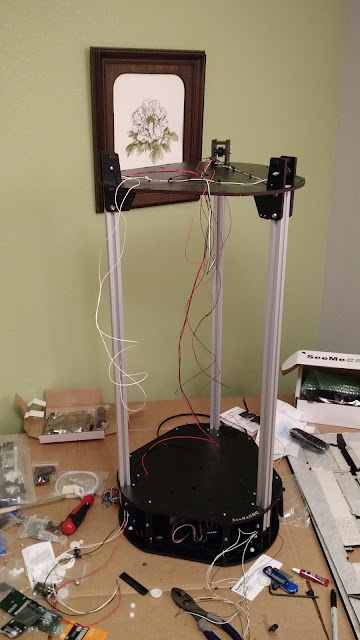
Once the skates were in place, I jumped ahead and installed the effector arms and the top plate so I could get a "beauty shot":

Doing things out of order would come back to bite me several times before I finished the build: the effector platform was upside down, and the top plate was rotated by 120 degrees - neither of which I noticed until after I installed other parts that had to be removed to correct the errors.
I had to call it a weekend at that point - my hot end was missing a port for the thermistor, which I'll go into on the next post:


The build started with the Base, including wiring up the power supply and installing the stepper motors:


A lot of people install dampeners on the stepper motors at this next stage. They get really good reviews for quieting the motor, but can also introduce a little bit of slop, causing artifacts in the prints. Since my printer is going to be living in the basement, I opted for accuracy over silence.

Worth noting: there's now a product called a SilentStepStick. It can do up to 256 micro-steps, and is supposed to be a drop-in replacement for most standard stepper drivers, which can only do 8 or 16 micro-steps (pretty sure mine does 16 micro-steps, but I haven't verified yet). Apparently, that increased stepping resolution removes a lot of vertical banding from parts made on Delta printers, and pushes all the stepper noise into higher frequencies that are not audible to humans. So all the noise is still there, it's just not audible (unless you're a dog, maybe. Hmm. I have a dog...).
The next day, I threaded wires through the aluminum extrusion towers and got the towers in place:


Next I installed the belt (A GT2 timing belt, which is supposed to have little-to-no backlash):


Once the skates were in place, I jumped ahead and installed the effector arms and the top plate so I could get a "beauty shot":

Doing things out of order would come back to bite me several times before I finished the build: the effector platform was upside down, and the top plate was rotated by 120 degrees - neither of which I noticed until after I installed other parts that had to be removed to correct the errors.
I had to call it a weekend at that point - my hot end was missing a port for the thermistor, which I'll go into on the next post:

