Monday, August 29, 2016

Chessbot Hero - White

I finally got around to doing the white version of the Chessbot Hero.

I am really disliking this white ABS filament. It's not sticking well (at all!) to the build plate, and I had to up the extrusion rate by 12% relative to the black ABS filament to get things looking half-way decent. Additionally, it seems relatively brittle. I spent several hours this weekend working on adjusting the printer to get a successful print.


I printed this one at its original scale, and it actually snapped together pretty well (one of the knights cracked in the process, unfortunately). This one can actually stand, unlike the black version, which I printed with a 1.5 scaling factor:


Original file here.
Nozzle: 220C
Bed: 100C
Chamber: 50C
Layer height: 0.2mm
Speed: 40mm/s
Time: 6 hours
Material: Hatchbox ABS

Unfortunately, the next print I attempted resulted in a jammed nozzle. 

Sunday, August 21, 2016

LED Accent Lamp


I have had this project in the back of my mind for a couple months, ever since seeing something similar pop up for $200. I picked up the electronics from China a while ago, but my ideas for the lamp body kept getting more and more complex. I finally decided to just knock this out over the weekend as a proof-of-concept.

I picked up a seven-foot length of trim with the cross-section I needed, and painted it white:


I then added three five-foot strips of RGB+WW (Red Green Blue + Warm White) LED strips and wired each strip to its own controller:


I shoved all the electronics in a section of vinyl drain pipe:


And then put the lamp in the corner.


Total cost was around $60.

There are a couple things I would do differently for a second version: the adhesive on the LED strips is pretty bad. I tacked the top and bottom of each strip in place with superglue, which is probably the only reason the LED strips have not fallen down already. Also, if I did this again, I would buy proper connectors for the LED strips rather than relying on my suspect soldering skills. Finally, using three controllers rather than one added $25 to the bill of materials, without adding a whole lot of functionality.

One interesting point: by setting one strip each to Red, Blue and Green, the light looks white, except at the edges.

But overall, I am very pleased without this project turned out!

Sunday, August 7, 2016

Printer is Running Again!

Unfortunately, I needed the kick-in-the-butt of my Dad coming out for a visit to prompt me to tear down and fix my printer.

I pulled off the heated-enclosure brackets and lifted the bed in order to access the stepper motors, then put locktite on all the motor pulleys.


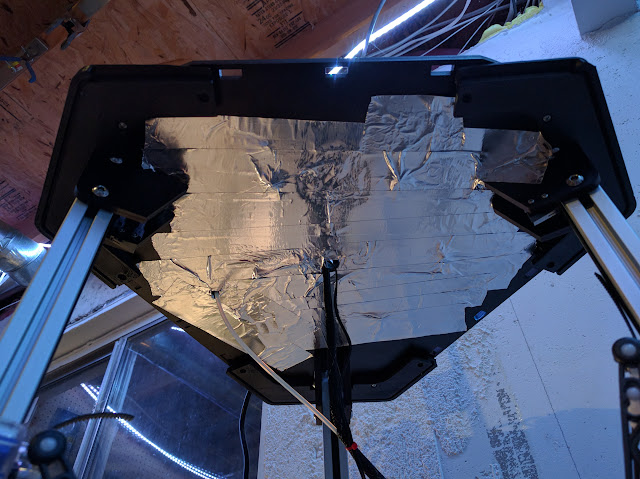
I also worked on the heat source for the heated chamber. Having two 150 watt bulbs right next to each other and inside a metal box concentrated the heat onto the top plate worse than I had realized. Here's the damage, viewed from below with the bulbs and fixtures removed:


To prevent this from happening again, I covered the bottom of the top plate with aluminum tape:


Later on, I'll clean it up and add some ceramic insulation around the bulb fixtures (I have to find it again - it got lost in my sea of stuff).

After a quick re-assembly (and some really quick calibration), I ran the file for "knurled bolt and nut", this time with white filament. All things considered, it turned out pretty well, though not as nice as the previous two I made.


All in all, it was some good male bonding, and Dad took the bolt and nut home as a souvenir!


Monday, May 30, 2016

Printer on Haitus

Bed is apparently out of level, and a second belt (for the Y tower) is showing wear. I checked the pulley on the stepper motor (the source of the problem last time) and it is out of alignment, despite being optimal a few weeks ago.

I have a few other upgrades I was planning to tackle after my current roll of filament, but I think I'll just take care of them now.

So...probably won't be printing for a week or two.

EDIT: ok, the bed probably didn't change at all. It looks like the worn belt slipped one or two spots, which puts the hot end on a plane slightly askew of the bed.

Pencil Holder - Organic

This one is for my wife:


If you look closely, you can see there was a ton of stringing. Stringing is usually caused by a nozzle that's too hot, retraction settings that are too low, or a combination of the two. I'll have to adjust those on the next print, because it was a pain in the butt to clean up all those protrusions:


Original file here.

Nozzle: 230C
Bed: 100C
Chamber: 50C
Layer height: 0.2mm
Speed: 40mm/s
Time: 15 hours
Material: Hatchbox ABS

Edit: For comparison:


Saturday, May 28, 2016

Filament Transition (and a Doohickey)

I just finished two kilograms of black ABS filament. I wanted to move on to white ABS filament.

I originally tried to hand feed the next spool into the extruder as the old spool disappeared. That didn't work, unfortunately. I wound up having to disassemble the bowden tube, snip off a couple inches of black filament, and reassemble the bowden tube with white filament well past the extruder gear:


Based on forum posts, I was expecting it to take a while for the black to flush out completely, but it seems like a pretty clean transition:


It's a fun little doohickey. My toddler likes it as well.

It was a pain to slice, though. I spent at least a half-hour trying different scales to get it to a point where it would print as six shells, rather than being split into twelve. I eventually got it at 1.6x scale.


Original file here.

Nozzle: 230C
Bed: 100C
Chamber: 50C
Layer height: 0.2mm
Speed: 40mm/s
Time: 6 hours
Material: Hatchbox ABS (mostly)

Wednesday, May 25, 2016

"The Last Word" from Destiny

In early April, I was asked to make a model of a pistol called "The Last Word" from the video game Destiny as a birthday present. I found a model I liked on the site MyMiniFactory.com and started trying to print it. This commission has been the connecting thread running through nearly all my experiences with the Rostock since I first got it printing.

Someone else's (successful) print
First attempt was just the handle on coarse settings, to get an idea of how big it would be in real life. I printed the two halves side-by-side, then glued them together. They warped pretty badly:


The warping prompted me to get started on the heated build chamber.

Once I had the chamber assembled, but before I added the heat lamp, I tried again. This time I combined the files for the handle and the body into one print, with the infill set at 50%:


50% infill was too high. I aborted the print and tried again, going back to 30% infill:


I still had pretty bad warping on the handle, and I don't really know what caused the last dozen layers to start drifting like that. It happened while the print ran overnight, and the error has not repeated since.

Once I got the heat lamp installed and the heated chamber completed, I tried printing the handle and body that would mate with my previous attempt. This time the X-tower belt broke about half-way through the print.


At this point, the birthday for which this piece had been commissioned had arrived. I assembled the two largest failed prints, along with some of the smaller pieces that had successfully printed, as a sort of "IOU" that I could present at the birthday party.


This turned out to be for the best: The gun is pretty huge, even without the barrel (which I had not even attempted to print yet). The recipient requested I scale down the whole thing to 80%.

Once I got the belt fixed and added a second heat lamp to the Rostock, I made a fresh attempt at the 80% scale model. At this point, the cold end of the extruder over-heated and jammed about a quarter of the way through. Literally minutes after I last checked the printer before going to bed.


As you can see, the 80% scale is a pretty significant reduction in size.

Once I moved the extruder cold end outside the heated chamber, I tried again. After a few false starts due to poor bed leveling or bad bed prep, I had a success!


I still had a little warping on one corner (the heated chamber was only at 40C), so I stuck a helper disc on that corner for the mating print. There was also a lot of stringing (kinda hard to see in this photo). Stringing is usually due to poor retraction, and since I increased the length of the bowden tube by more than 50% when I moved the extruder outside the heated chamber but did not adjust the retraction settings, I should have expected this. I made a small adjustment on the next part and see how that turns out.

The helper discs worked perfectly! No warping at all on the next print:


I had adjusted the retraction from 6.7mm to 10mm, which reduced the stringing but did not eliminate it.

I also knocked out the chamber, which I printed without support. It's pretty.


Interestingly, one of the skirts got dragged under the first layer and I was unable to fish it out before the first layer was printed:


Progress Pic:


The barrel turned out pretty nicely for the first try. I set it up so the two files comprising the barrel printed at the same time. Unfortunately, that still left a visible seam - I'll have to develop my CAD skills to fix that kind of thing in the future.


A quick zip-tie assembly of all the finished parts:


Gluing the pieces together. I had to go out and buy more clamps:


I modeled up my own "pin" to hold the chamber onto the hinge, and was so excited to see the finish line that I forgot to take a picture. The hinge itself pivots on a piece of nail, so there shouldn't be any worry of the hinge wearing out. Here it is with the glue drying:


Aaaaaaaand here's the final product!


Just shy of two month's worth of hobby time. Phew.

Original file here.

Nozzle: 230C
Bed: 100C
Chamber: 50C
Layer height: 0.2mm
Speed: 40mm/s
Time: around 40 hours for the final version.
Material: Hatchbox ABS

Chessbot Hero

I've been wanting to do this one for literally three years. Finally pulled it off:


I scaled up the original file by a factor of 1.5. Since that's a linear scale, the actual volume increased by a factor of 3.375.

Unfortunately, the pawns don't snap together like they should - they just fall apart. Other people have had this problem too, and there's a modified pawn file that I'm going to print next to see if it fixes the issue.

UPDATE: the modified pawns fit together a bit better, but not enough to actually stick. I'll have to try them again at normal scale and see if that changes anything.

UPDATE 2: I tried a normal-scale print of two pawns. The print failed when I ran out of filament, but enough of it completed to prove the pawns latch much better at the original scale:


Original file here.

Nozzle: 230C
Bed: 100C
Chamber: 50C
Layer height: 0.2mm
Speed: 40mm/s
Time: 13 hours
Material: Hatchbox ABS

Tuesday, May 24, 2016

Pencil Holder - Hexagons - 2x speed

I doubled the printing speed settings from 40mm/s to 80mm/s and re-sliced the model.

At the start, it was clearly operating at double speed, and on the second layer the Rostock started to stutter, like the three towers weren't in sync any more. I dialed the speed down to 75%, which seemed to eliminate the stuttering, then went back to 100% once the base was done.

However, the print still took 11 hours. I'm not sure what happened there.

Also, this print had some pretty bad curling on the base, presumably due to the (initial) high speed.

So, this has been an interesting experiment with printing faster, but I don't think I'll try 80mm/s again in the immediate future.


Original file here.

Nozzle: 230C
Bed: 100C
Chamber: 50C
Layer height: 0.2mm
Speed: 80mm/s (in theory)
Time: 11 hours (doesn't make any sense)
Material: Hatchbox ABS

Sunday, May 22, 2016

Pencil Holder - Hexagons


Those sharp overhangs and bridges printed really nicely!

Original file here.

Nozzle: 230C
Bed: 100C
Chamber: 50C
Layer height: 0.2mm
Speed: 40mm/s
Time: 11 hours
Material: Hatchbox ABS